
A Link Between Home Networks
How I connected my parents' Roku to my Jellyfin server using Tailscale.
I’ve been running a Jellyfin server on my homelab for a while now, and it’s been great so far. I even got Chromecast to work with it. Now, I wanted to take it a step further and be able to access Jellyfin from my parents’ house.
I didn’t want to expose my services to the internet, so I decided to use Tailscale to create a connection between the two networks. Since you can’t install Tailscale on a Roku, I used a Raspberry Pi as a gateway.
Network setup
Tailscale is pretty easy to set up. In just a few minutes, I was able to reach my media server from the Raspberry Pi.
I could have used a simple SSH tunnel to make Jellyfin accessible to other devices, but I wanted to keep using the same IP address I use at home. This way, I wouldn’t have to constantly change server addresses for devices that connect to both networks, like my phone.
To accomplish this, Tailscale has a feature called subnet routing which allows devices to advertise a subnet to the Tailscale network.
Guide
Install and set up Tailscale.
First, install and set up Tailscale on both the Raspberry Pi and the media server.
At this point, I was able to ping between the two using their Tailscale IP.
Opening 100.78.76.211:8096 on the Raspberry Pi’s browser took me to Jellyfin’s login page.
Advertise and accept routes
Next, configure Tailscale on each device to advertise its home network and accept routes from the other.
On the media server, run:
server:~ $ tailscale up --advertise-routes=192.168.1.0/24 --accept-routesAnd on the Raspberry Pi, run:
pi:~ $ tailscale up --advertise-routes=192.168.2.0/24 --accept-routesThen, go the Tailscale admin console to approve the advertised routes.
Now, I could ping between the two devices using their local IPs (192.168.x.y).
Configure the routers
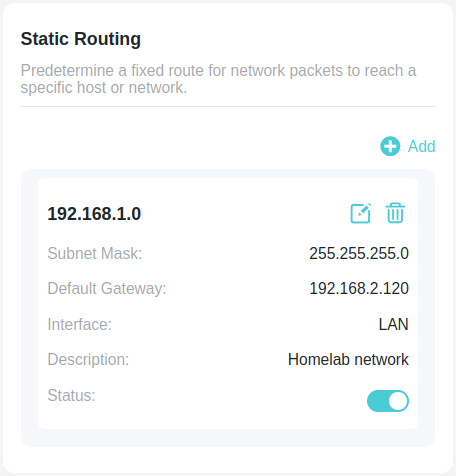
Next, configure the routers to forward packets for the other network through their respective gateways.
For example, tell the router in 192.168.2.0/24 that if it receives a packet for 192.168.1.70 it should forward it to the Raspberry Pi. Do the same for the other router.
This is usually under a static routing setting.
Enable IP forwarding
This makes the Raspberry Pi and server act as routers.
echo 'net.ipv4.ip_forward = 1' | sudo tee -a /etc/sysctl.d/99-tailscale.conf
echo 'net.ipv6.conf.all.forwarding = 1' | sudo tee -a /etc/sysctl.d/99-tailscale.conf
sudo sysctl -p /etc/sysctl.d/99-tailscale.conf
(See Tailscale’s official guide for more details.)
With this setup, I was finally able to access my media server from the Roku using the local IP address from my home network.
Now, any device on either network can communicate with devices on the other. This can be nice to share a printer, or access security cameras, but I have to be extra careful securing the devices on both networks.